This page is meant for running the streaming. On the left we find the stream preview, below it the details of the broadcast and two ways of broadcasting to the stream; on the right the stream status, the number of connected users and the chat.
We can broadcast in two ways, switching between them with the tabs at the bottom of the page:
- Broadcast from FenomioStream Broadcaster — the simplest way. The app broadcasts from a webcam and a shared screen, sets itself up according to the portal and also switches the status of the broadcast by itself.
- Broadcast from your own software — for those who already have streaming software or a device (for example OBS Studio) and want to put the broadcast together themselves.
Broadcasting from FenomioStream Broadcaster
The Broadcast from FenomioStream Broadcaster tab has two steps:
- Download the broadcasting app — with the Download for Windows or Download for macOS button we download the installer and install the app. The installation does not require administrator rights.
 Broadcast — the Broadcast from the app button launches the app. The browser asks whether it may open it; we confirm and the app gets ready for this particular stream. We do not enter the server address or the stream key anywhere.
We then start, pause and end the broadcast in the app — we do not need the status buttons on this page. How to work with the app is described in the FenomioStream Broadcaster article.
If the broadcaster is someone without an account on the portal (for example a guest lecturer), we use the Create a link for the broadcaster button in the More options box to create a link, which we send to them by e-mail. The link opens a page with the app to download and a button to start broadcasting. It is valid for 7 days.
Broadcasting from your own software
On the Broadcast from your own software tab we find the streaming server address and the stream key; with the  icon next to each value we copy it to the clipboard. If the portal also offers encrypted broadcasting, there is additionally the server address for RTMPS.
The recommended procedure
- Install software that supports broadcasting over the RTMP protocol on your computer. There are several software solutions for broadcasting; if you are not sure which one to choose, we recommend OBS Studio.
- Enter the streaming server address and the stream key from the Broadcast from your own software tab in it.
- Start the broadcast in the streaming software — after a certain delay you should see it in the stream preview window.
- At this moment the participants of your stream still see the “waiting screen” on the playback page, so you can use this time to set up the camera, check the lighting and so on.
 At the planned time (and if you are ready) press the Start streaming button.
- Only after this action do the participants see the player and your broadcast stream.
- Now you can concentrate on the broadcast and on communicating with your viewers through the chat on the right-hand side of the screen.
 If you need to, you can pause the broadcast with the Interrupt broadcast button — the participants see the “waiting screen” again — and start it again afterwards.
 At the end of the broadcast, first press the End streaming button, which switches off the playback page for all participants. Only then end the broadcast in the streaming software.
Below the stream key, for a stream that has not started yet, there is the Change stream key button. We use it if the key may have leaked: a new key is generated, previously created links for the broadcaster stop working and the streaming software needs to be reconfigured.
Preview and broadcast details
In the Stream preview window we see the broadcast exactly as it goes to the viewers. Until the broadcast is running, there is a notice in its place that the broadcast has not started yet; after the start we wait for the picture, and after the end a notice says the broadcast has ended. The preview starts muted; we switch the sound on with the Unmute button.
Below the preview there is the scheduled stream date, in the Properties row the type of the stream (PUSH or PULL), the protection set and whether a recording is being made, and finally the link to the public page of the stream, which we send out to the viewers; with the icon we copy it to the clipboard.
Viewers and chat
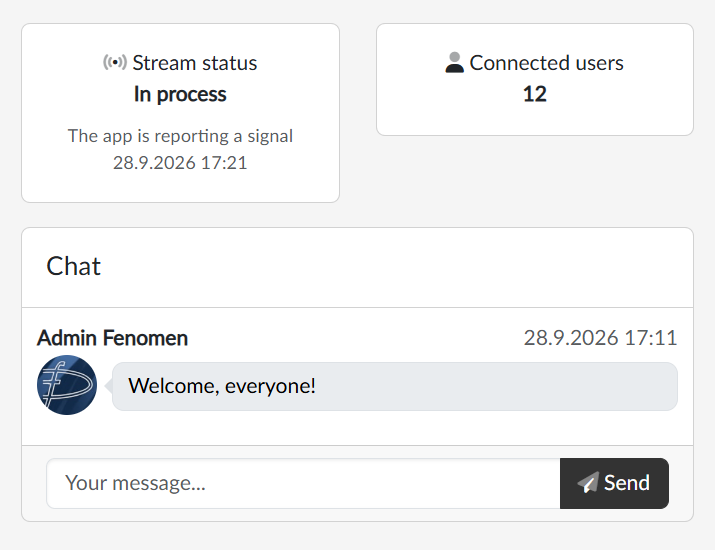
On the right-hand side of the screen we see the current stream status and the number of connected users. When broadcasting from FenomioStream Broadcaster, below the status we can also see when the app last sent a signal; if it has not been heard from for two minutes, the line turns red — the stream may no longer be broadcasting.
Below them there is the chat, in which we can communicate with the viewers during the broadcast: we write the message into the field at the bottom and send it with the Send button or with the Enter key.
The chat is shown only if it was allowed for the stream; otherwise there is information in its place that the chat is disabled. We can switch it on or off on the Overview tab, as long as the broadcast has not ended.
PULL streams
For a PULL stream the portal fetches the picture itself from a source system, which also controls its broadcasting. The buttons for starting, interrupting and ending the broadcast and the tabs with the ways of broadcasting are therefore not shown; instead there is a notice that the broadcast is controlled by the source system. The broadcast details additionally include the source mountpoint — the identifier of the source the portal fetches the picture from.